End to end testing - Cypress basics
12 May 2025When you’ve made a change to your web-app, do you run it then click around the new bits to check it works? Good start, but instead of doing that yourself, do it in a faster, more comprehensive and automated way with an end-to-end (E2E) testing setup using Cypress . Here’s how.
E2E
End to End testing is testing your app as a user might - by clicking links, entering data, looking at the screen and checking everything is okay, but it’s scripted like a unit test and the results are checked with assertions. Like unit testing this allows you to build up a collection of comprehensive tests that easily detect for unexpected behaviours - not just in the results of functions in your app, but in the user experience of the app.
In the case of Cypress, this works by running your app in an instrumented browser. The tests are written in JavaScript and might ask things like “Click the ‘Home’ link” and have an assertion similar to “check the home page loaded”. Let’s see how that will look.
How it looks
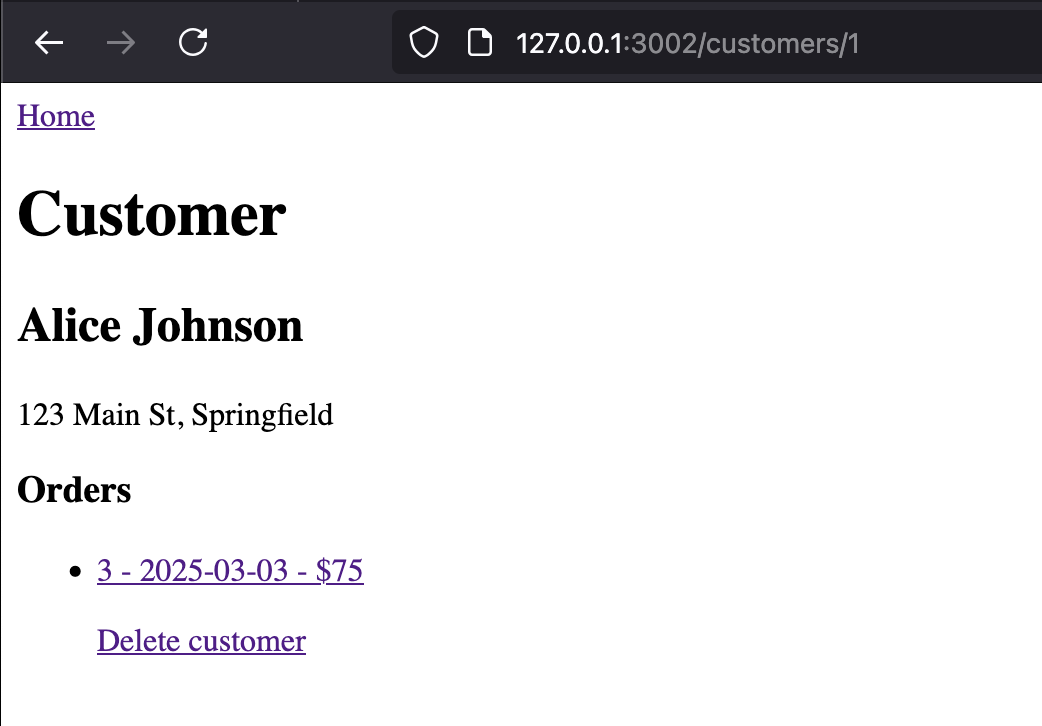
In the app I’m working on, if you view an individual customer (say at “http://127.0.0.1:3002/customers/1 ”) there’s a “Home” link at the top which takes you to the list of customers (at “http://127.0.0.1:3002/customers ”).
Here’s the test code:
describe('Page Navigation', () => {
  it('should navigate to the customers list when clicking the Home link', () => {
    // visit the customer details page
    cy.visit('http://127.0.0.1:3002/customers/1');

    // find and click the Home link
    cy.get('a').contains('Home').click();

    // verify we navigated to the customers list page
    cy.url().should('eq', 'http://127.0.0.1:3002/customers');
  });
});
If you’ve been writing unit tests before, this format will be familiar, but let’s look at the steps:
cy.visit('http://127.0.0.1:3002/customers/1');
You guessed it - we’re telling Cypress to visit that page.
cy.get('a').contains('Home').click();
I’m not sure if Cypress uses JQuery , or just a JQuery like syntax, either way, what we’re doing here is selecting the ‘<a …>’ tag. Of course our page probably contains several anchor tags, so we’re refining this search to the anchor tag that contains ‘Home’. Note that there’s an implied assertion here. If there is no link on the page containing ‘Home’, this test will fail with an error saying something like “Expected to find content: ‘Home’ within the element: but never did.”
Finally the click() at the end of the statement tells Cypress to click this link.
cy.url().should('eq', 'http://127.0.0.1:3002/customers');
Before we look at this statement, consider that we haven’t told Cypress to wait for a bit for the results of our click() to process - one of the benefits of Cypress is it just figures that out magically.
This statement is an assertion - the URL should equal (eq) the URL we’ve provided.
So that gives us a quick overview of a simple test. Naturally Cypress has a heap more operators and assertion types to help us test our application - basically everything you could think of as user-facing testing. Let’s look at a simple demo app then work through the tests we might try for this.
The App
This app is a simple demo I wrote for an earlier blog post about using the Express router. We have Customers and Orders, a single customer can have zero-many orders. The opening page is a list of all customers. Clicking on a customer shows the details for that customer, including a list of their orders. Clicking on an order shows the detail for that order, including a link the customer it belongs to.
The Customer and Order detail views have delete links, and a deletion of a customer should cascade to delete that customer’s orders.

Installing Cypress
Installing Cypress is straightforward. The install steps from the docs are here , but really it’s just starting your Node project (so you’ve got a package.json) then npm install cypress --save-dev to add it as a dev dependency. It’s a big download so expect it to take a bit. It includes lodash, some AWS stuff, tldts, day.js, a heap of vue stuff - just, it’s a lot of big dependencies. Also since Cypress itself does some cool stuff linking into the browser - that functionality requires some code.
The Tests
Actually - the code in our very simple demo above covers about 70% of the testing I do, and the pattern of:
- Select a user element
- Click it or add some text
- Select another user element to check that worked
comes up again and again. So I’m going to try not to repeat myself too much. Most of what’s new in the following tests will be extra selectors, and assertions. We won’t cover all of them, but rather a smattering to get started with.
// test for customers list page
describe("Customers Page", () => {
it("should have the home page redirect to customers page", () => {
cy.visit("http://localhost:3002");
cy.url().should("include", "/customers");
cy.get("h1").contains("Customers");
});
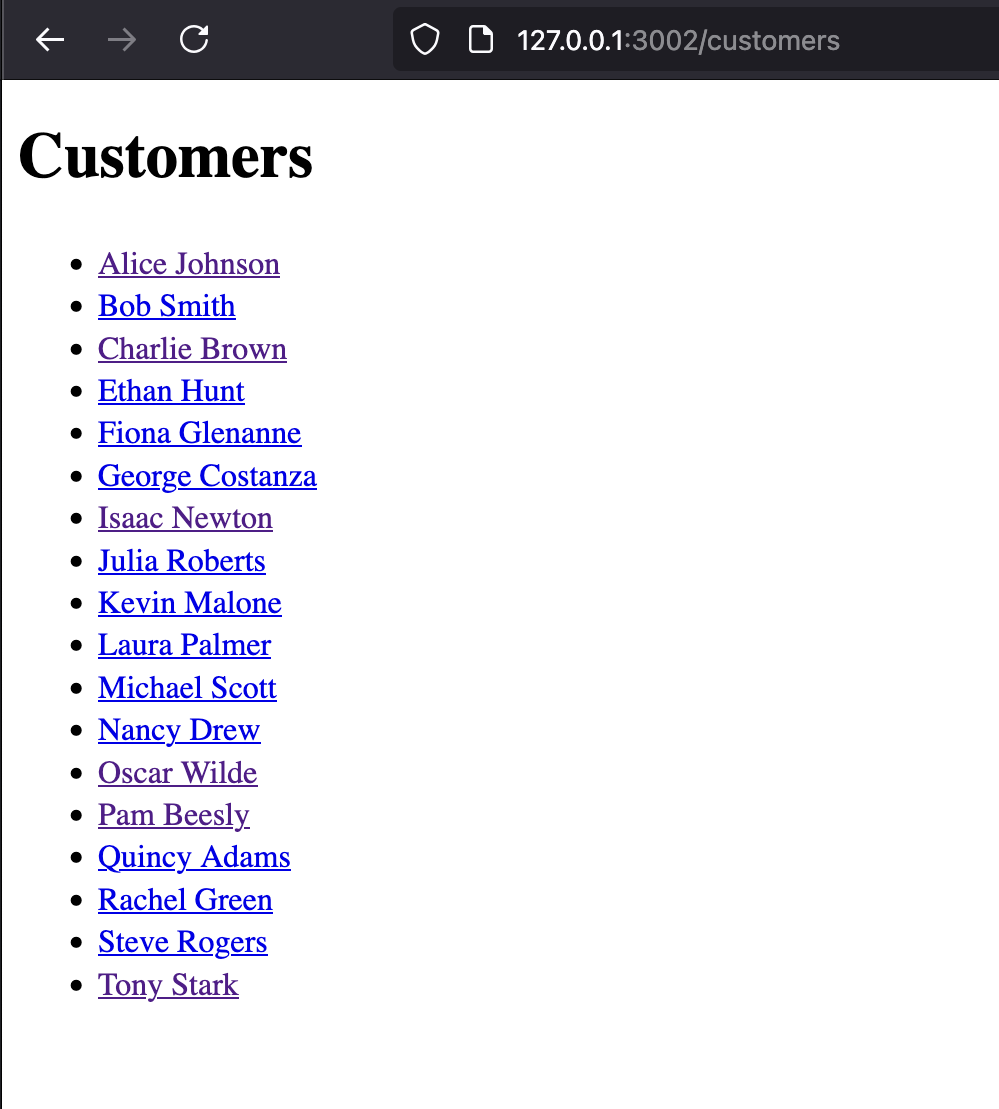
it("should display a list of customers", () => {
cy.visit("http://localhost:3002/customers");
cy.get("li").should("have.length.at.least", 5);
cy.get("li").eq(0).contains("Alice");
});
it("should have working links to customer details", () => {
cy.visit("http://localhost:3002/customers");
// click the first customer (Alice)
cy.get("a").contains("Alice Johnson").click();
cy.url().should("include", "/customers/");
cy.get("h2").contains("Alice Johnson");
});
});
.should()
There’s a massive list of should() assertions , and they depend a bit on what you’ve chained on to. In the first example we looked at we used "eq" for equals, in the example directly above we’ve used "include" for a partial match, and "have.length.at.least" for what it says on the box.
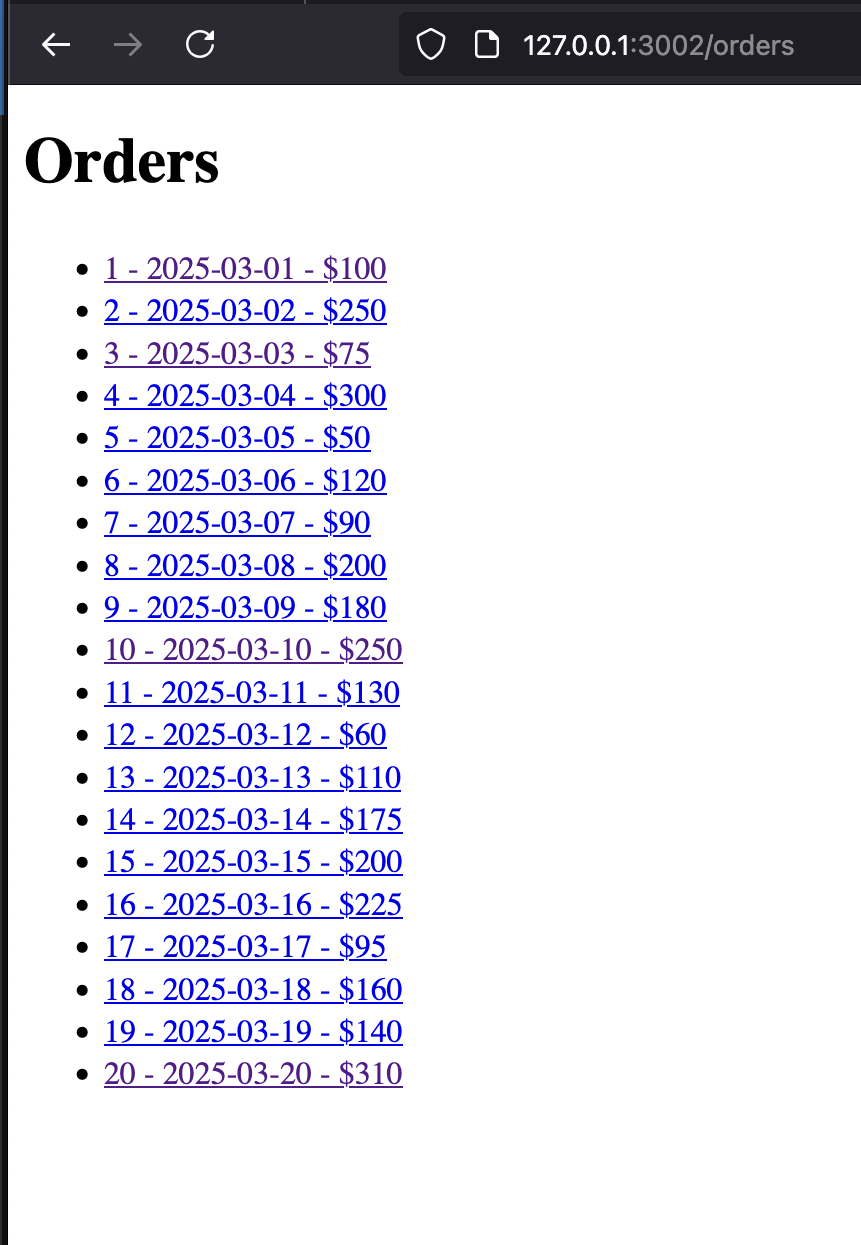
Another handy thing might be testing for "not.exist". In my example app if I want to test deleting a customer, I can check they exist in the customers list, click delete, then check that they no longer exist in the list:
    it("should delete a customer when delete link is clicked", () => {
      // first check the customer exists
      cy.visit("http://localhost:3002/customers");
      cy.get("a").contains("Hannah Abbott").should("exist");

      // visit the customer page and delete
      cy.visit("http://localhost:3002/customers/8");
      cy.get("a").contains("Delete customer").click();

      // verify the customer is deleted
      cy.url().should("include", "/customers");
      cy.get("a").contains("Hannah Abbott").should("not.exist");
    });
.get()
We’ve already seen selecting an anchor tag with get(“a”) - this will work for any HTML tag, but of course you’ll frequently need more specificity than that. As described in the docs , most of the JQuery selectors will also work with get.
// Select by element type
cy.get('button')

// Select by class
cy.get('.my-class')

// Select by ID
cy.get('#my-id')

// Combining selectors
cy.get('button.primary#submit')

// Select by attribute
cy.get('[data-test="submit-button"]')
Those first four are straightforward, but you might not know about attributes.
Attributes
As part of the HTML specification, tags can have attributes. You’ve been using them all along. For example. this button:
<button id="submit" class="btn primary" type="submit">Submit</button>
has attributes for:
- id
- class
- type
These all have particular meanings for HTML, CSS and JavaScript, but actually we can make up our own. For example we could say:
<button type="submit" data-test="submit-button">Submit</button>
There’s no specification for ‘data-test’, it’s just a convention, we could just have easily said:
<button type="submit" data-green-zebra="submit-button">Submit</button>
Note that I’ve kept the data- prefix - that is part of the HTML5 specification . We could probably make up anything and it would work, but maybe it would conflict with something in a future HTML version, so best stick to “data-”.
Using attributes for specifying the element we want is highly recommended. Although the element you want to click might currently be the third in ainside the
.invoke() and then()
Sometimes the exact test you need might not be available, or you need to do some operation as part of your testing that requires a bit more processing. In that case, you can chain the invoke() method. This allows you to call any jQuery method on an element you’ve selected with Cypress, letting you extract specific properties or manipulate the element in ways that aren’t covered by Cypress’s built-in assertions.
Once you’ve got it, you can use then() to run an arrow function against it to do something. The pseudo codes looks a bit like this:
cy.get(selector)
  .invoke(jQueryMethod)  // Extract what you need
  .then((result) => {    // Process it with your own logic
    // Custom processing
  });
Let’s look at an example. Imagine the HTML of our page looks like this:
<span class="price">$24.99</span>
And we want to check that the price was greater than $20 - perhaps we are supposed to have added tax or something. Our test could look like this:
cy.get('.price')
  .invoke('text')
  .then((priceText) => {
    const priceValue = parseFloat(priceText.replace('$', ''));
    expect(priceValue).to.be.greaterThan(20.0);
  });
This selects this span based on it’s class, then saves the text ‘$24.99’ to priceText, extracts the value to a JavaScript number, and asserts it to be greater than 20.
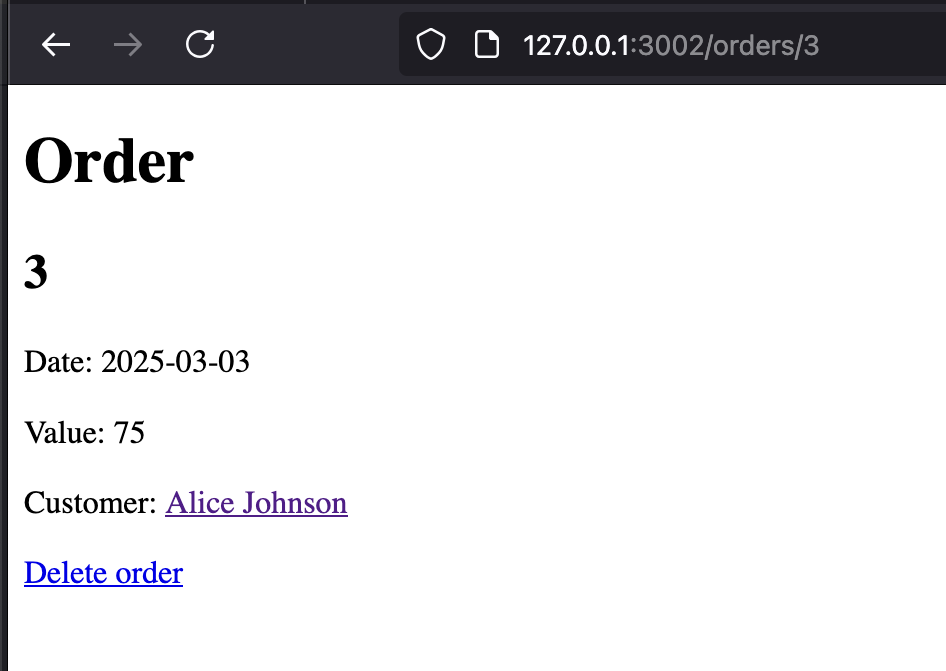
In my demo app, I use this to check the cascading delete - when we delete the customer, the orders for that customer should also be deleted. Rather than hard code the order number we can use invoke/then to extract it from the text which looks like this:
8 - 2025-03-08 - $200
Then, after deleting the customer (and orders) we navigate to the orders page to make sure that order number does not exist there any more.
  describe("Cascading Deletions", () => {
    it("should delete owned orders when a customer is deleted", () => {
      // first make a note of an order for a specific customer
      cy.visit("http://localhost:3002/customers/4");
      cy.get("h2").contains("Diana Prince");

      // note an order ID that belongs to this customer
      cy.get("ul li a")
        .first()
        .invoke("text")
        .then((orderText) => {
          // extract the full order text to use for matching later
          const orderTextFull = orderText.trim();
          // extract just the order ID number
          const orderId = orderText.split(" ")[0].trim();

          // delete the customer
          cy.get("a").contains("Delete customer").click();

          // verify customer is deleted
          cy.url().should("include", "/customers");
          cy.get("a").contains("Diana Prince").should("not.exist");

          // check that the order is also deleted
          cy.visit("http://localhost:3002/orders");
          // make sure we're matching the exact order (not just a substring)
          cy.get(`a[href="/orders/${orderId}"]`).should("not.exist");
        });
    });
  });
There is a lot, lot more to Cypress to this, but with what we’ve covered here it’s possible to write a comprehensive suite of tests that will test all of the functionality in this demo app in about 200 lines .
Using Cypress
So that’s all the code, but how does it look to test like this? For me this is one of the things that makes end-to-end testing cool. I love seeing it’s click away in the browser at super speed as my tests turn green.
First of all I start my app - so however you normally do this. For me, it’s dropping to the terminal in VSCode and running it in Node. Something like node index.js
Once that’s going we can start Cypress. Since the first terminal is running my node app, we need to spawn another terminal to run Cypress in. This is a simple matter in VSCode - just hit that + button I’ve circled in the screen shot below. You can swap between the different terminals you have open by clicking on them in the list underneath that + button.
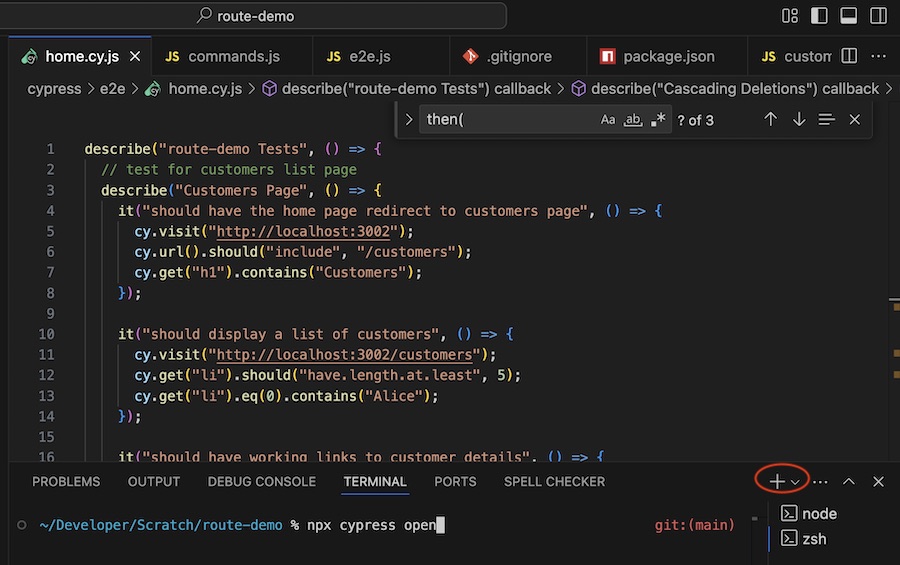
We start Cypress in the new terminal with npx cypress open but the magic does not happen in the terminal, this thing pops up:
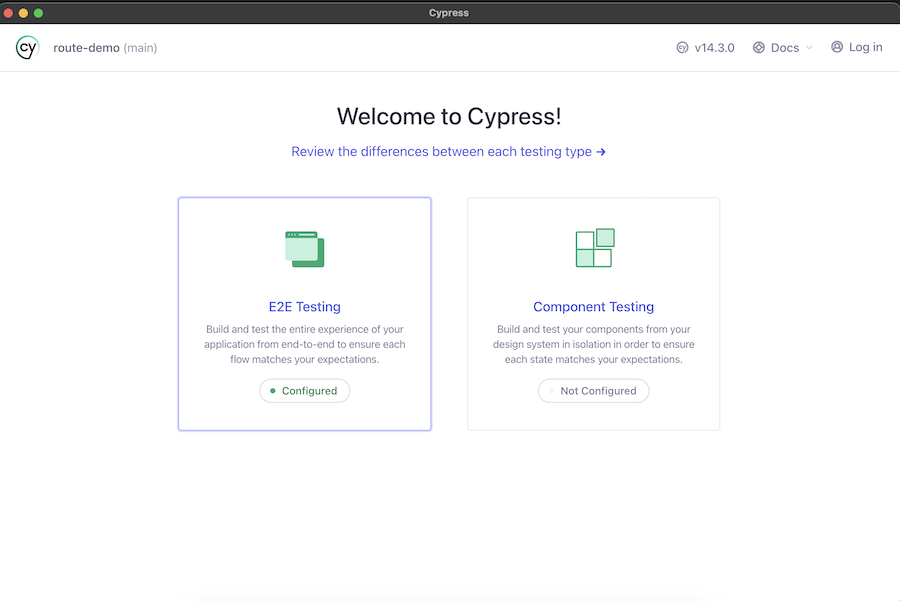
We’re doing E2E testing, so select that.
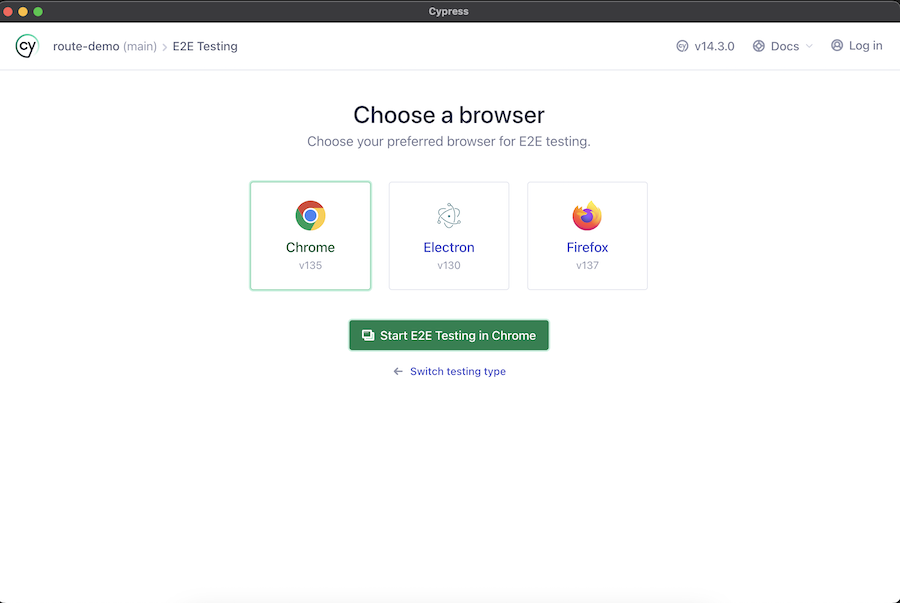
I’m in a Chrome mood today, so next we see this:
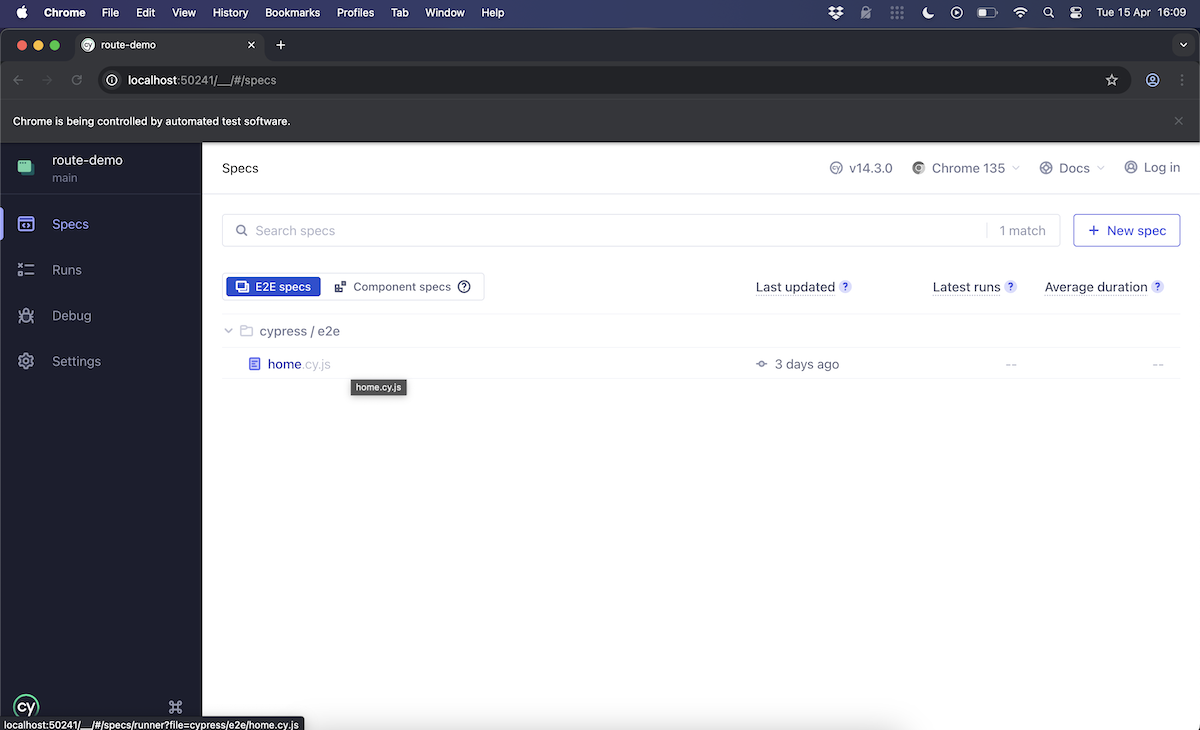
I’ve only got one test file - home.cy.js, so I click that. The tests are listed down the left side of the browser, and my app in an iFrame to the right. As the tests are running, I can see the app flicking through each step. In a couple of seconds the seventeen tests that comprise many page manipulations and assertions are finished and I can see the results.
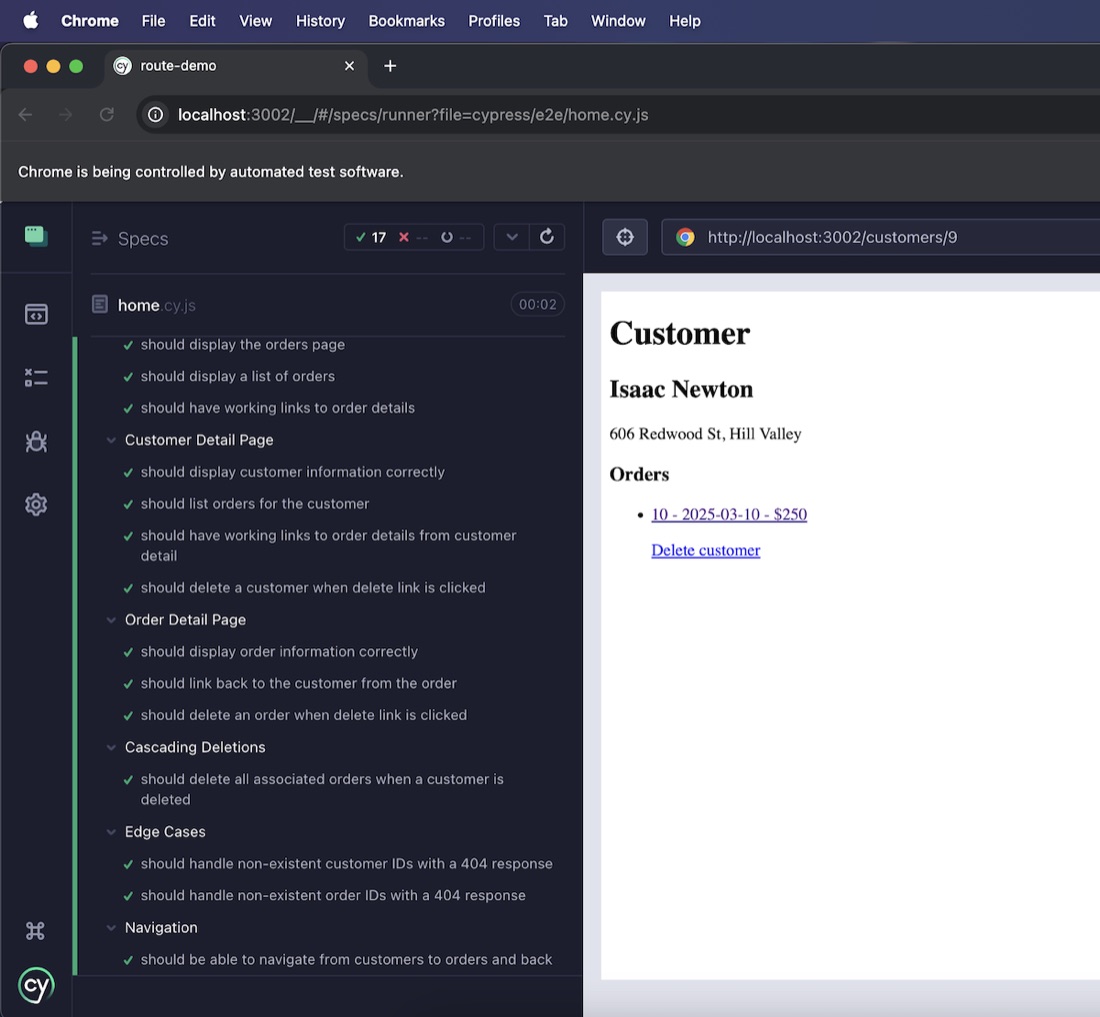
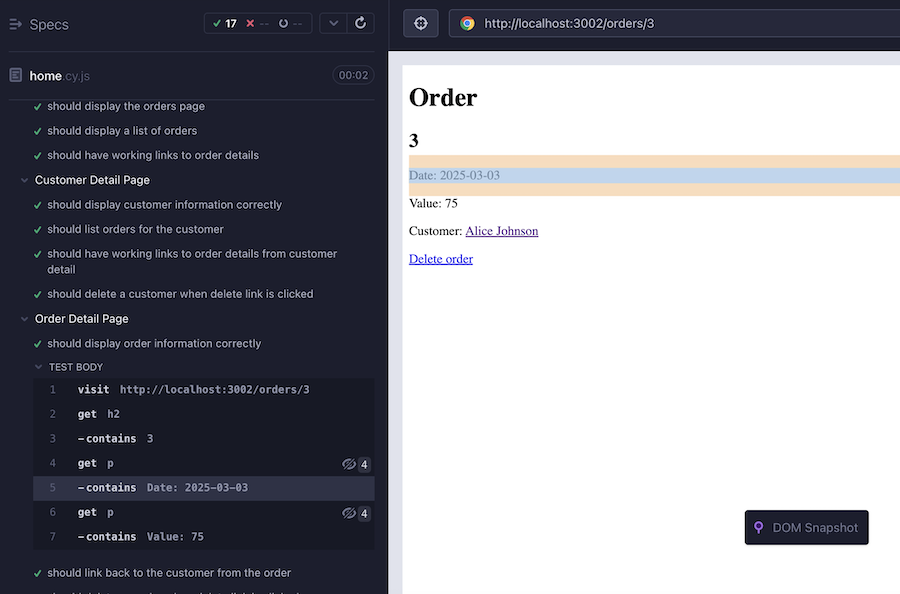
If we click on a test, the details for it open up, and a screenshot of the application state at the time of that test is displayed.

The most common debugging problem I’ve run into is when I didn’t write the selection correctly (and didn’t use a data- attribute). These are easily checked in this view by hovering over the one we’re interested in - the element that Cypress used in this step will be highlighted.
So, how does a failed test look. I can create that in this test suit just by running the tests again. It won’t be able to delete orders or customers it deleted in the earlier run.
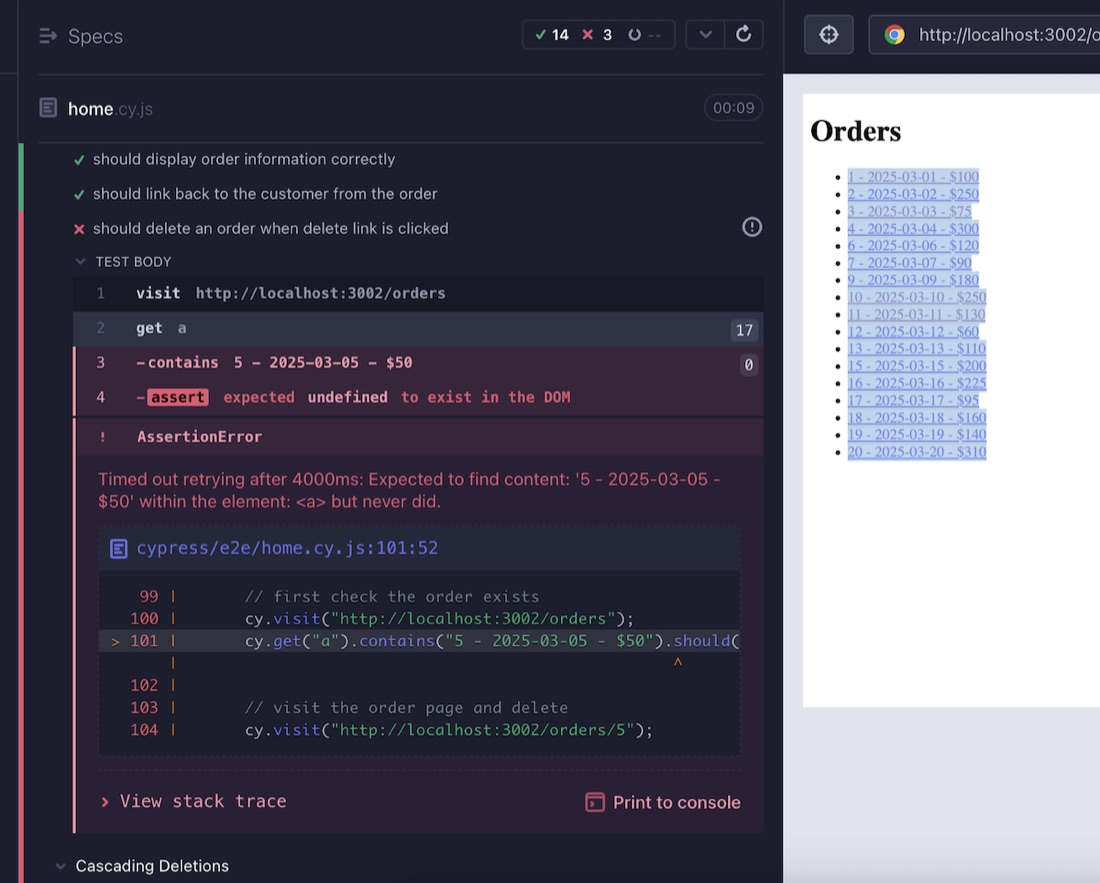
So, at the start of this ‘delete order’ test, I’m checking if the order exists, and it doesn’t (because we didn’t reset after deleting it last time). We can see from the error message that Cypress waited 4 seconds in case it was a timing issue. It’s displayed the test case where the failure has occurred. This along with the before and after snapshots of the app around each test make locating problems a breeze.
Resets
The pattern above (where you run a test twice and it fails the second time because the first execution changed the state) is common. To avoid this, we need some system of resetting the state. Cypress has a mocha like ‘beforeEach’ ability. You most always need this for logging things in:
describe('My app tests', () => {
  beforeEach(() => {
    // This code runs before each test in this block
    cy.visit('/login'); // for example
    cy.get('input[name=username]').type('user');
    cy.get('input[name=password]').type('password');
    cy.get('button[type=submit]').click();
  });

  it('should show the dashboard after login', () => {
    cy.url().should('include', '/dashboard');
    cy.contains('Welcome').should('be.visible');
  });

  it('should navigate to settings', () => {
    cy.get('nav').contains('Settings').click();
    cy.url().should('include', '/settings');
  });
});
But for apps that need things like a fresh database before testing, it’s a bit trickier. In the past I’ve sometimes created some sort of /test-reset endpoint which feels like an unreasonable security risk. The proper answer is to shell out with a Cypress task. That way we can do things like copy in test data, or spin up a whole test environment in a container. These are meaty topics for another post - but really, our tests should be re-run-able, and run-able in any order so we might come back to that.
Test
Any testing is better than none, and if you use these sorts of tools that make it easier you’ll find you’ll add to them, especially when errors crop up. If I sit down to add end-to-end tests to an existing app, I nearly always find things I want to change to make it better. Use end to end testing.