Hosting Your Own Docker Registry
25 Mar 2024
The Docker Personal (ie free tier) plan currently allows one private repository, but even if you want to pay for the next level where you can have unlimited repositories, you may still want to host your own private registry - it’s going to be quicker inside your network, and you won’t run up against Docker’s pull/push limits if you are hammering it with your CI/CD system.
There are fancier tools, but in this post we’ll look at the basics of how to use the official registry app from Docker.
Initial Setup
The registry app is (unsurprisingly) dockerised. So I’ve created a directory for the docker-compose.yml file, and a data sub directory.

And the yaml.
services: registry: image: registry:2 container_name: registry restart: unless-stopped ports: - "5000:5000" environment: REGISTRY_STORAGE_FILESYSTEM_ROOTDIRECTORY: /data volumes: - ./data:/data
docker compose up, and bingo. Our registry is live.
Creating an image
Now our registry is up, let’s jump over to another machine, and create an image to store in it. I’m only going to minimally explain this, since if you’re interested in your own registry, you’ve probably been down this path.

dockerfile
FROM busyboxRUN mkdir /appCOPY script.sh /app/script.shWORKDIR /appRUN chmod +x script.shCMD ["./script.sh"]
script.sh
#!/bin/shecho "Hello from Docker!"
So basically, this image contains a small Linux distro, and all it does is run a script that outputs “Hello from Docker!” to the console. We can build our image by switching into the directory with the dockerfile and running:
sudo docker build -t hello-docker .
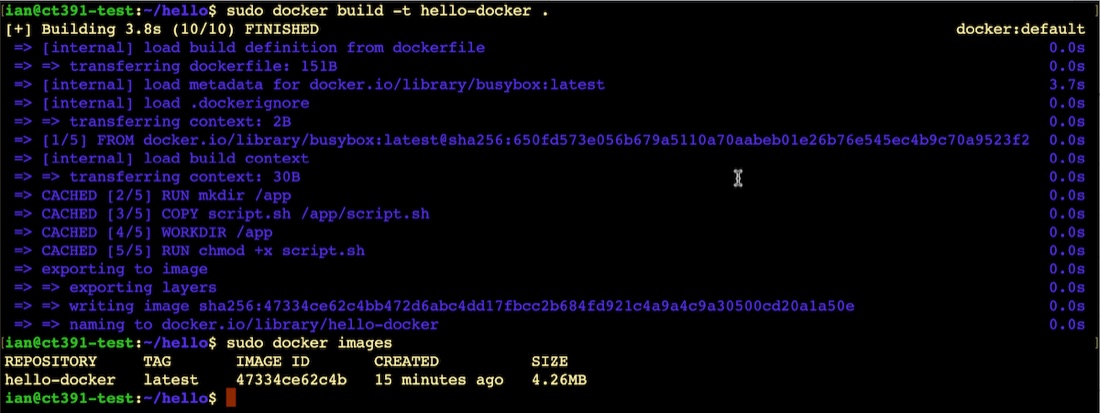
If you want to run it to check my docker skills, use
sudo docker run hello-docker
Pushing & Insecure
Now I want to push the image we’ve created to the new registry we set up earlier, but we’re going to run into a problem.
I’m using two Debian virtual machines (LXCs actually) both on my homelab network. They’ve been named with Tailscale to make things clearer in the screenshots. (If you’re following along you’ll probably be using IP addresses). Importantly, there are no TLS certificates, self-signed or otherwise.
First we need to tag our image to include the registry name:
sudo docker tag hello-docker:latest ct390-docker-reg:5000/hello-docker

And we’ll try to push it up to our registry with:
docker push ct390-docker-reg:5000/hello-docker

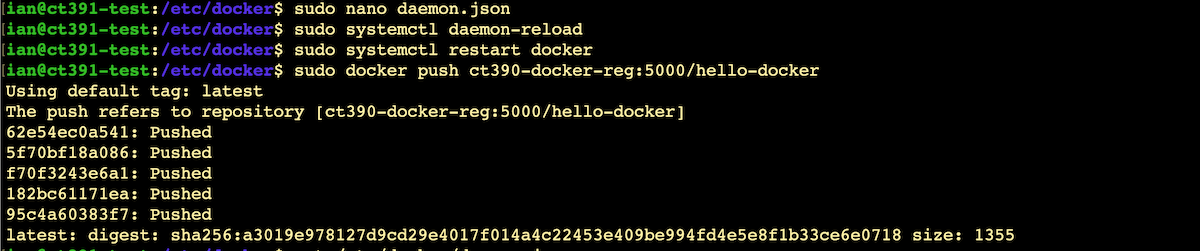
What’s happening is that Docker would (quite reasonably) prefer to only work over secure connections. We can override this on this machine for today’s demo purposes by adding an exception for our self-hosted registry. You’ll need to create the file /etc/docker/daemon.json and add the registry that’s going to be allowed like this:
{ "insecure-registries" : [ "ct390-docker-reg:5000" ]}
If we restart docker and retry the push now, it should work:
That looks like it worked. If we wanted to check, we can just hit an endpoint on the registry:
curl http://ct390-docker-reg:5000/v2/_catalog

Pulling & Insecure
Of course the ultimate test is going to be to use this image from a third machine, so let’s spin one up with a clean docker install with no images and try to run the image we’ve just added to our registry.
We’re going to have the same challenge pulling from a non-TLS registry as we had pushing to it, and the workaround is going to be exactly the same - add the registry to the insecure list in the /etc/docker/daemon.json
echo '{ "insecure-registries" : [ "ct390-docker-reg:5000" ]}' | sudo tee /etc/docker/daemon.jsonsudo systemctl daemon-reloadsudo systemctl restart docker
Now we can run it. Since we don’t have the image locally yet, docker will pull it down for us from the registry before running it:

And that’s it. Our own private Docker registry to store our images.
References
In writing this post, I relied on some these resources:
- Digital Ocean - How To Set Up a Private Docker Registry on Ubuntu 20.04
- Baeldung - Configure a Private Docker Registry
- O’Reilly - Configuring Docker to Push or Pull from an Insecure Registry