Moving a Docker image as a file
20 Jan 2025I’m having a super annoying problem at the moment, I can’t pull down containers from DockerHub. If I hotspot my laptop off my phone it works fine, so it’s some drama with the home internet connection that rebooting the router does not fix.
I’ve had a couple of different errors including Error response from daemon: Get "https://registry-1.docker.io/v2/": net/http: request canceled while waiting for connection (Client.Timeout exceeded while awaiting headers) and Error response from daemon: Get "https://registry-1.docker.io/v2/": dial tcp: lookup registry-1.docker.io. I can’t actually ping registry-1.docker.io or hub.docker.com, although I can open hub.docker.com in a browser, so it works for ports 80 and 443, but not some other udp ports.
Anyway, I needed to update my Jellyfin server as the app on my TV was complaining that it would stop working on the next Android app update if I didn’t upgrade to 10.10. Since all my homelab gear is connected through the home internet, I needed a way to download the container to my laptop (connected to my phone), then reconnect to the home network and shift the container to the server.
Turns out this is no drama.
What is an OCI image?
Before I run through the commands, it’s worth appreciating exactly what a container is. It’s comprised of layers - you will have noticed this pulling or building them. And if you already have a layer (perhaps you’re pulling two containers based on debian:stable) it will only download that layer once, and the second time it will find it via the giant sha256 hex string and reuse it. Of course if we have all these layers hanging around (don’t worry about exactly where - it’s abstracted away for us) you need some sort of document that says which exact layers in what order make up the container image. We could call that the manifest.
So if we wanted to export an image, it would basically be a collection of binaries named with those sha256 names, and a manifest that describes how to rebuild it. We’ll see later it’s a tiny bit more complex than that, but not by much.
Commands
First you need to have pulled the image down from the repository, so when you list your images with docker image ls you can see it in the list. In my case, since I was working on an M1 (ARM) MacBook and wanted the Linux/64 image (to run on my Debian VMs) I had to specify the platform I needed from the multi-architecture image
docker pull --platform linux/amd64 jellyfin/jellyfin
Once it’s pulled down, we output it to a file:
docker save -o jellyfin.image jellyfin/jellyfin
jellyfin.image is just what I’m calling my file, it could be anything. In fact, lets call it jellyfin.tar, that will be more fun.
docker save -o jellyfin.tar jellyfin/jellyfin
Only because it actually is a zipped up file. You can probably guess what’s going to be in it:
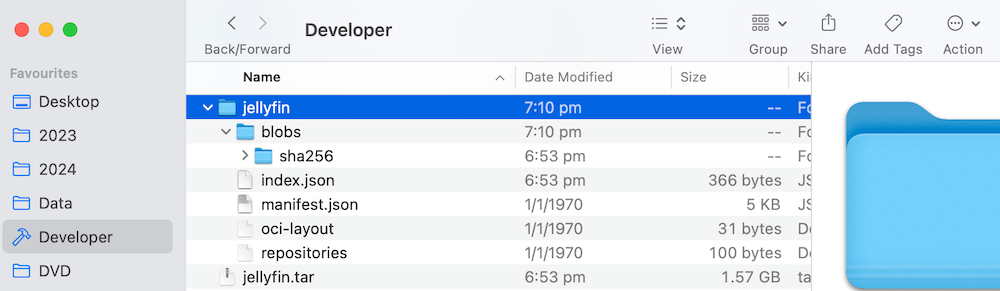
Yep - a folder of layer binaries named with their sha256s, and a manifest file saying how to put it together.
Once you’ve got your image in it’s file, you move it to the machine where you need it, then make it available to docker there with:
docker load -i jellyfin.image
Once that’s done, it will be available with it’s original name and tag, and you’re good to go.