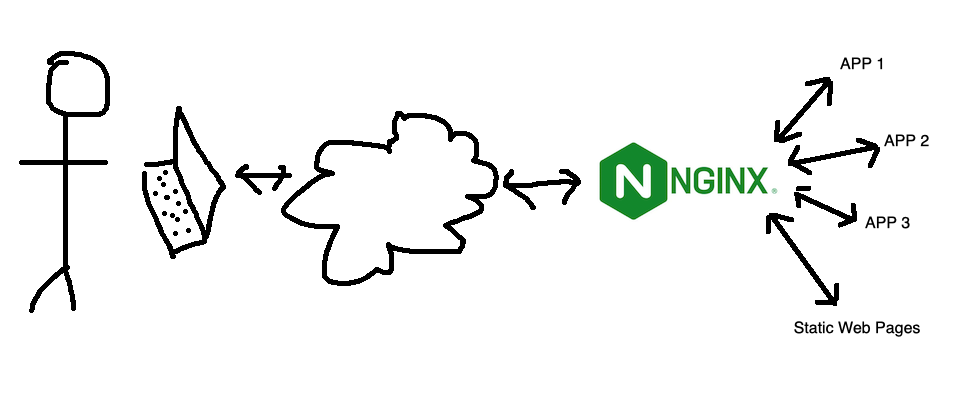
I’ve mentioned using NGINX as an interface between the internet and a service a while ago. This works by all incoming traffic coming to NGINX, and NGINX determining which service that traffic should go (from the NGINX config files) then acting as a middleman. This functionality is generally referred to as a ‘reverse proxy’.
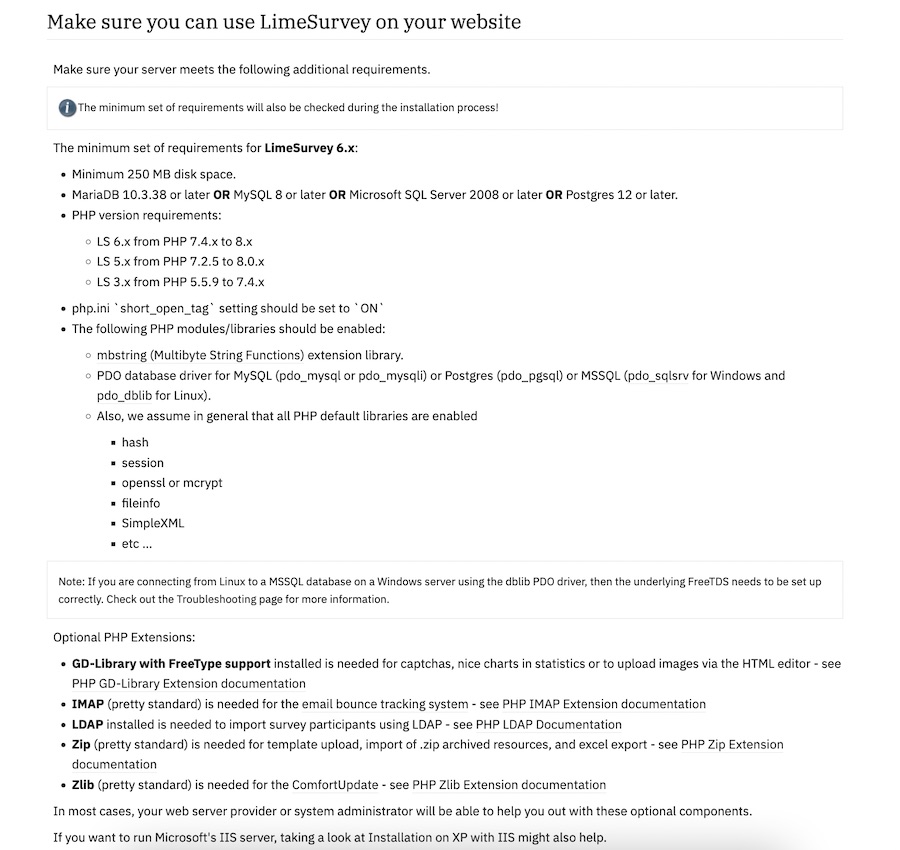
I need a survey tool, and a quick search turned up LimeSurvey , there’s a ‘community edition’ so naturally I plan to self-host it. I scrolled down to the ‘installation’ section of the manual which has a big list of PHP dependencies.
Ain’t nobody got the time for that in 2024, I scroll further looking for the docker-compose but there isn’t one. Huh. No official Docker image.
I’ve settled on a very standard, reproducible setup for services in my homelab. This post looks at that, then runs through the update I did today to Forgejo which only took a few minutes and felt relatively risk free.
Standard Setups
My system is based around Proxmox. I have three physical machines - one for production apps, a production spare, and a development/testbed machine. A Synology NAS serves for backups. Moving a VM or LXC between the machines is trivial; but it’s done manually - the machines are not clustered for high availability.
When I wrote the install instructions for mdserver (little Markdown server Node app) on it’s github page it was something like:
Have node.js installed and working
Clone the repo
Start with npm start
Which is great if you know how to do those things (they are bread and butter to a web dev) but not if you’re a self-hoster who just wants a web server that converts markdown to HTML on the fly. For any situation where you just want to use the app, what you probably want is a Docker image of the app.
The Docker Personal (ie free tier) plan currently allows one private repository, but even if you want to pay for the next level where you can have unlimited repositories, you may still want to host your own private registry - it’s going to be quicker inside your network, and you won’t run up against Docker’s pull/push limits if you are hammering it with your CI/CD system.
I had a number of domains all running on one host when I first set them up with certbot. One started to be serious, so I moved it to another host and ran certbot there. That all worked perfectly, but of course, the old domain is still part of the original certificate, so when I went to renew it, it came up with some errors.
Here’s a few commands that are going to help navigate this situation if you’ve found yourself in the same spot:
One of the basic requirements for any serious web app is a proper users/roles/authentication system - but if you’re just throwing up a utility of some kind on a public IP for testing, and you don’t want it to be abused, then this could be an option. There’s a few components:
Your app. In this demo it’s going to be Node, but it could be Go or whatever your server-side poison is. The app is listening for connections on a non-web port (ie not on 80 or 443), I’m going to use the traditional 3000.
A firewall. That port (in my example 3000) must not be accessible from the internet. It has to be blocked by a firewall.
A web server (I’m using nginx) that enforces basic auth.
I briefly discussed web server basic auth earlier - it’s a system built into the web server that requires a log in for a route, and authenticates it against the credentials in a password file (usually named .htpasswrd) and only serves the content if authenticated.
Since I’m using Tailscale to painlessly manage all my networking on the homeserver here and my remotes, I’ve had the luxury of being a bit casual about the security of my internal apps and self hosted dev tools. I’m currently iterating on a web app that requires public access, and is therefore up on a VPS and exposed to all the evils of the open internet.
I am in no way a security expert, but here’s a few of the (reasonably simple) steps I’ve taken to secure my node app.
When you are learning app development, you can create all sorts of apps that work for you, but for any serious app, it’s going to need to authenticate users and persist sessions across visits. So much so, that as a professional developer, you’ll probably build that out first - it becomes a sort of boiler plate you always drop in.
In this post, focusing on the server side, using node, express, and particularly express-session, I’ll try and build up from nothing to a reasonable usable user login system explaining the increasing complexity and reasons for it. To follow along you’ll need basic familiarity with node and express.
I don’t often just link to someone else’s content, but I was really impressed with Brad Traversy ’s “Web Development In 2024 - A Practical Guide” video. Apparently he does these every year - it’s just a really comprehensive overview of Web Development pitched at beginners.
I’ve been aware since I set up Uptime Kuma for my monitoring, that having an instance on my local network monitoring my VPS websites wasn’t ideal. The main reason being that the flakiest part of my infrastructure is my 4G home internet, so if that goes down I have no website monitoring, and even if I did, the notifications couldn’t get out.
Of course, it would also be a simple matter to run an instance on the VPS that I host the sites on, but that has a similar problem in that if the VPS goes down, so does my monitoring of the VPS. What I really need is a third, independent space to run an instance.
I watch a lot of programming demos on Youtube, and it’s been low key bugging me for a while that everyone has cooler little icons in the explorer view of their VS Code than I do. For example, they have the HTML 5 shield logo next to their index.html, but I have the little fragment tag <>. Really, there was no point spending two hours customising my OhMyZSH! terminal if I’m just going to let myself down with disappointing VS Code file icons.
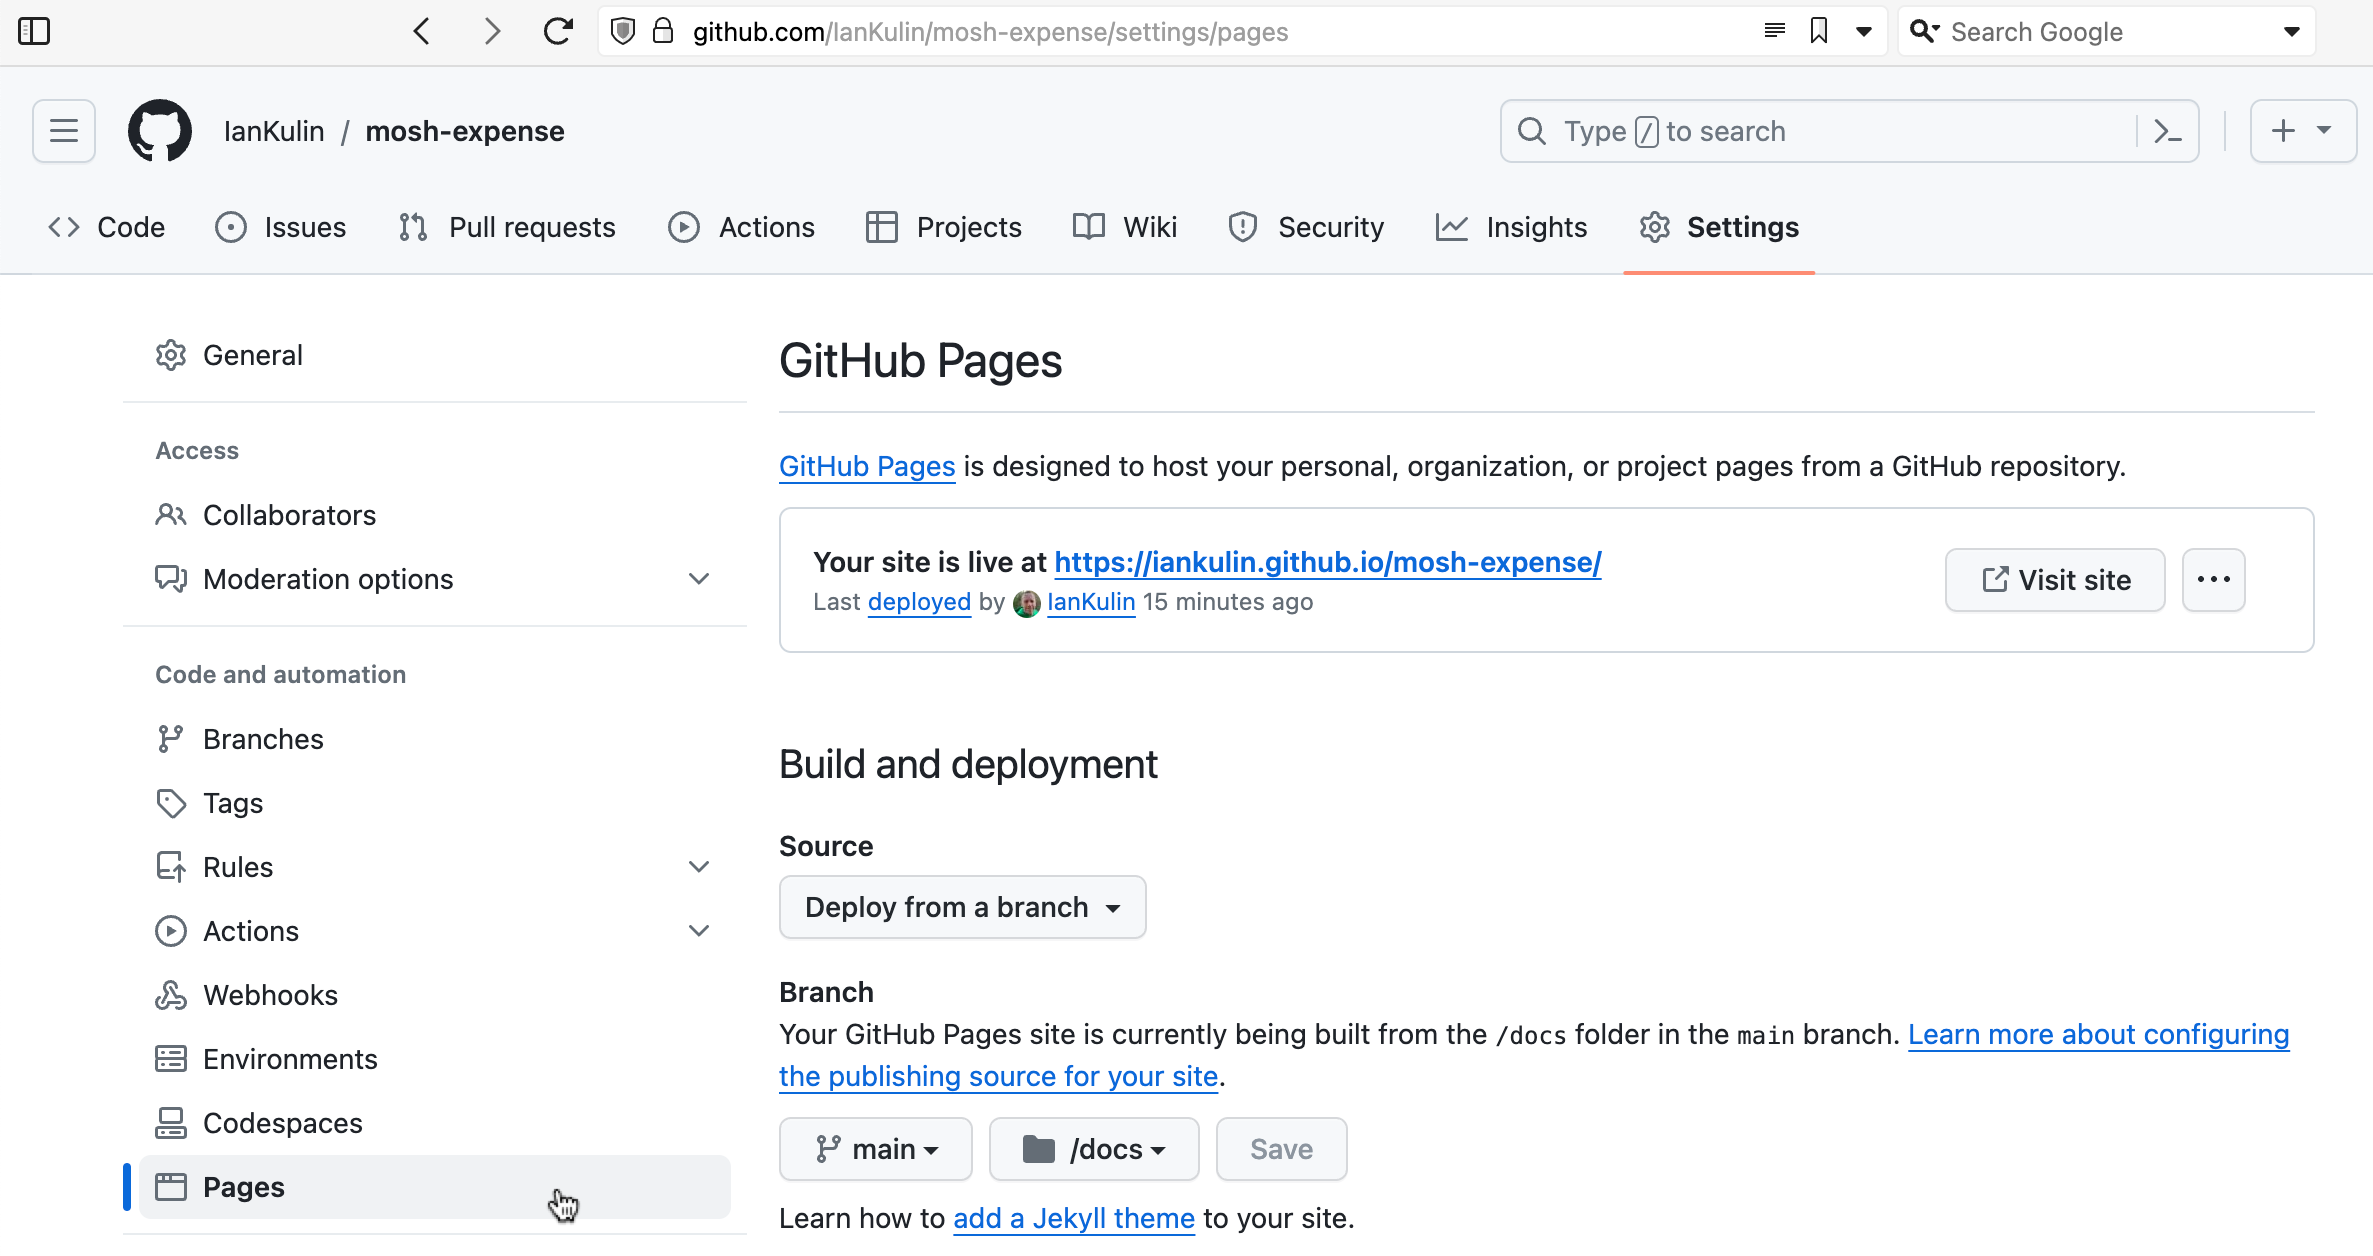
One of the many cool things about GitHub is GitHub Pages - the free web hosting Microsoft gives you while they vacuum up your code for CoPilot training. Each repository you keep there can have pages at <your-github-username>.github.io/<repo-name>
GitHub
To enable this, you need to go into the settings for the repository - look down the left for “Pages”.
It’s possible to have it based on a complicated GitHub action (where your build step happens on GitHub when you push your code), but the easiest thing is just to have it deployed from a branch. To do this you choose which branch (usually main) and whereabouts in the main branch your HTML is. The choices are in the root of your project, or in the /docs directory. I’ve chosen the /docs directory in the screenshot above, since my messy React project is in the root.
I’m focused on React frontend skills these holidays, and working through Mosh’s React 18 course. The exercise today (which I think I nailed, although I spent more than the recommended hour on) was a small app to track expenses. Like most of Mosh’s exercises it was great because it exercised all the understandings up to that point - so it’s a good starting React project. It used Zod for the form validation which is completely new to me, but looks great.
If you work or study in tech, I always feel a good getting-to-know-you question is “what courses or tutorials did you start, but not finish?”
My Udemy doesn’t look too bad:
The ZTM course was good, but I got stuck on an AI API exercise. I think it’s a common sticking point for students since Andrei includes a little rant about how it definitely does work - but I downloaded his repo with the solution and it was having the same errors I was and I gave up in frustration. I probably should have just skipped that one.
I’ve paid for a month of Mosh to do his React 18 course , and one of the things he makes a big deal about is not to go too deep with nested objects for your state. As soon as you start to update them it becomes apparent why.
Because of the way state works in React, if we need to update part of an object it has to be deep copied, the changes applied to this copy, then that new copy passed back to React to replace the previous version. So, how we copy objects becomes a matter of particular interest.
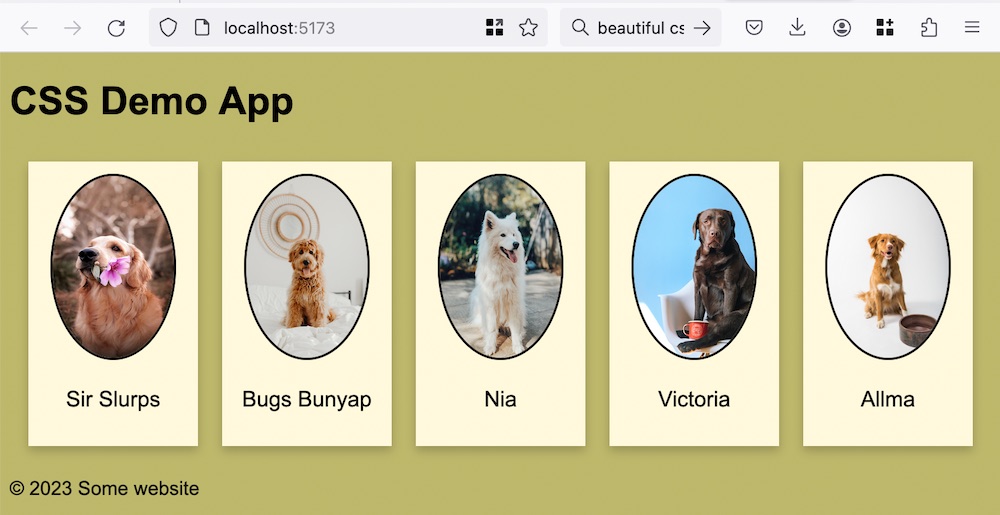
If you think back to HTML as being a document with headings and paragraphs and other semantic bits, it made a lot of sense to have the styles (expressed as CSS) separate to the document. This allows us to change the styles without touching the document - perhaps the user wanted a dark theme, needed the text bigger for accessibility, or perhaps the document was being consumed in some other way - for example a screen reader - so the styles were superfluous.
Since I’m on a roll making different versions of the To Do app, this might be a good time to talk about React . React is one of the giants of front end libraries. It’s based on a few big ideas - and to work effectively in React you need to wrap your head around these.
Overview
Components - when you are developing in React, the starting point of your build is to decompose the user interface in to logical pieces. These components (comprising a mixture of HTML and Javascript) will be the building blocks of your app. In a good composable architecture components are reusable, and that is true for React (there are several sources of components you can pull in). For example, if you created some sort of special slider for your app, it is possible to reuse that quite easily.
HTMX is an interesting project to me, and I’ve used it a bit in my large collection of 70% completed side projects, but haven’t really discussed it here. The plan for this post is to talk briefly about what it is exactly, then convert a simple ‘conventional’ (HTML/CSS/Javascript) app to htmx and think about some the differences.
htmx
You could (I recommend you do) read the book about the concepts behind htmx . Carson Gross (the man behind htmx) calls it a book, but its quite the treatise, it could fairly be called a manifesto.
Bruno is a great open source Postman/Insomnia replacement, and I’ve been using it for basic tests of my node servers using the built in asserts and loving it. This is pretty great, and I gather it’s also possible to go beyond this and write tests in JS in Bruno . I believe it also has the hooks needed to build it into your CI/CD systems.
Any large project is probably going to benefit from a more comprehensive suit of testing tools, and while I’ll still be using Bruno, my serious tests will be managed with these other tools.


 Subscribe to my UX design course 😉